"; */ ?>

spring


10
Sep 10

Spring Expression Language: Calling a Method with Parameters

Have you ever wanted to win $1,000,000 with a single SpEL ( Spring Expression Language ) call? Well, now you can, and here is how.

Let’s say there is a Lottery that deposits money to a winner’s bank account and congratulates the winner:

private class Lottery {
    // ...
    public String congratulateWinner( String name, BigDecimal amount, Date date ) {
    	String now = new SimpleDateFormat( "MM-dd-yyyy" ).format( date );
    	String cash = new DecimalFormat( "$#,###,###" ).format( amount.doubleValue() );
 
    	return "Congratulations " + name + "! " +
    	       "Today is " + now + ", and it's your lucky day, because " +
    	       "you just won " + cash + "!";
    }
}

Here is how to make Anatoly win money with SpEL:

"congratulateWinner( 'Anatoly', #amount, #date )"

( of course, let’s not forget to set an amount to at least a million dollars ).

And here is a million dollar unit test:

@Test
public void shouldInvokeMethodWithParameters() {
 
    Lottery lottery = new Lottery();
 
    GregorianCalendar calendar = new GregorianCalendar();
    calendar.set( 2010, 8, 10 );
 
    BigDecimal amount = BigDecimal.valueOf( 1000000.00 );
 
    // letting SPEL know about the "lottery", the "amount" won, and the "date"
    EvaluationContext context = new StandardEvaluationContext( lottery );
    context.setVariable( "amount", amount );
    context.setVariable( "date", calendar.getTime() );
 
    ExpressionParser parser = new SpelExpressionParser();
 
    // using '#' to identify a variable ( NOTE: #this, #root are reserved variables )
    Expression exp = parser.parseExpression( "congratulateWinner( 'Anatoly', #amount, #date )" );
 
    String congratulations = ( String ) exp.getValue( context );	
    assertEquals( "Congratulations Anatoly! " + 
                  "Today is 09-10-2010, and it's your lucky day, because you just won $1,000,000!", 
                  congratulations );
}

(!) Do not write code that does not earn you money :)


6
Apr 10

Spring Batch: Quick Start

Spring Source Logo

You heard about Spring Batch, but have this “uneasy” feeling about where/how/what you should start with? A year ago it was truly difficult for a non geek developer (most of the developers) to start with projects like Spring Batch, Spring Integration, Spring Webflow, Spring MVC, etc.. But now..

Now, you have no excuse: it is extremely simple to build a sample Spring project, of pretty much any “flavour”, that comes pre-built with unit and integration tests, that you can run right after those 12 seconds that you spent downloading the project, and resolving dependencies.

Does it sound helpful? Well, not really, since I just said what will happen, and how easy it is to make it happen, but there was no how part… I hate when people do that :)

So without further ado, here comes the “how” part:

Step 1. DON’T PANIC :)

After successful completion of Step 1, it is time for…

Step 2. Download Spring Tool Suite

As I already mentioned in “Spring Insight in Action – 5 Minutes From Scratch“, I like to think about Spring Tool Suite as Eclipse on Spring rocks (Spring IDE, Spring Interactive Tutorials, Exception Resolution, Grails support, Spring Insight, Spring tc Server, Spring Template Projects, and much more): http://www.springsource.com/products/springsource-tool-suite-download

Step 3. Create New Spring Template Project

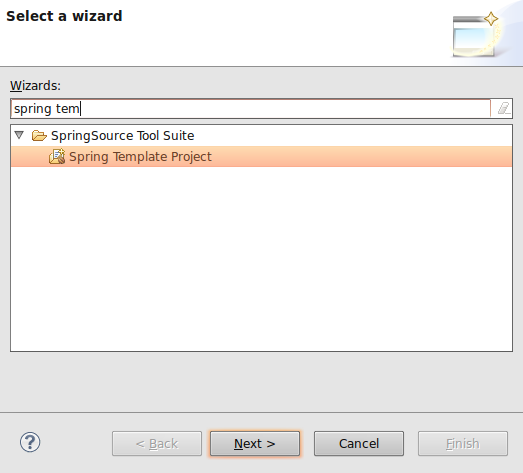
After Spring Tool Suite is started (remember, it is just a Spring version of Eclipse, so it should look very familiar), press Ctrl+n to create “something” new, and start typing “spring temp…”:

Spring Tool Suite: New Spring Template Project

As you type, Eclipse will narrow down selection to “Spring Template Project”. Select it, and click Next:

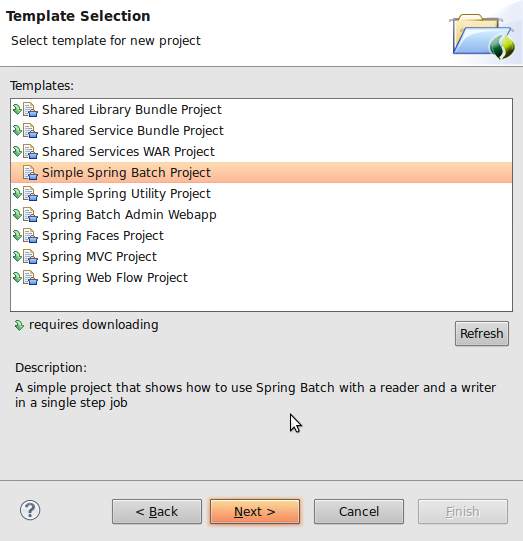
Spring Tool Suite: New Spring Batch Template Project

Here you can see many hot and ready to go Spring template projects that you can explore. The purpose of this article is to show how easy it is to start with Spring Batch, but for the most part, you can follow these steps to create all of the projects from the list above. (as an extra credit, try to create a Spring Integration Template project, once we done here).

Select “Simple Spring Batch Project”, and click Next:

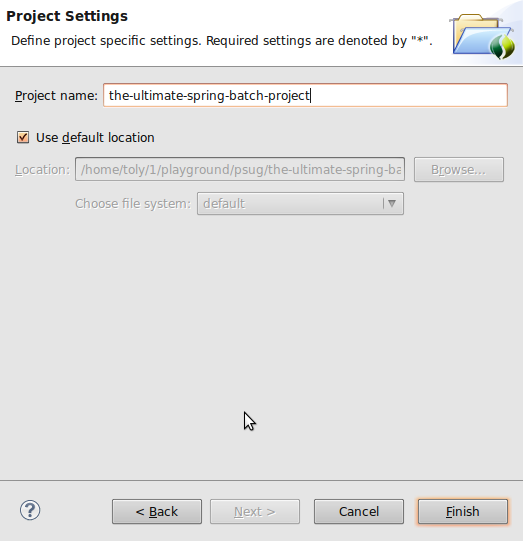
new spring batch template project name

Name your fresh and ready to go Spring Batch project, and click Finish, here is what your own Spring Batch project will look like:

spring batch template project live

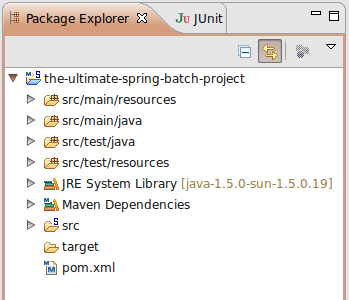
You are actually done right here, but, since curiosity is what makes us humans, let’s take a look at what’s inside:

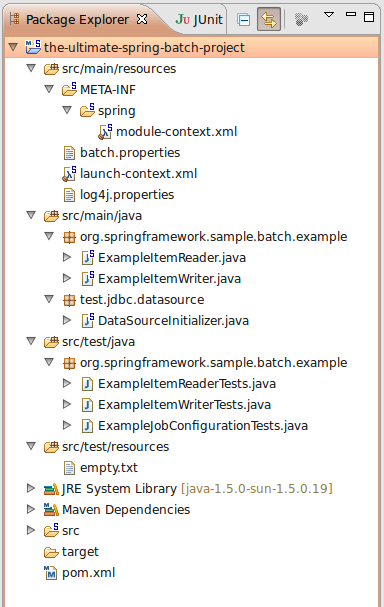
spring batch template project structure

As you can see, it is a Maven structured project with all the goodies: source, tests, pom, configs, etc..

Let’s look at your first real Batch Job. Double click on “module-context.xml”:

spring batch template project job config

In order to make sense of what you are looking at, you can refer to a very good and extensive Spring Batch documentation: http://static.springsource.org/spring-batch/reference/html/index.html

Step 4. Make Sure It Works

But hey, don’t just believe me that it works => make sure it does! And how would you do that? Well, again, simple: just run a test:

spring batch template project run test

Now you should see some green, which actually tells you: “it works indeed”.

Now you see, that starting to work on any major Spring Project is only a couple of mouse clicks away. You can really feel how close and accessible all that knowledge is. So be brave and take it all!

Good Luck!


10
Feb 10

Multiple Around Advices Applied to the Same Join Point

Spring and AspectJ

So, what do you think will happen if you apply two around advices to the same join point? They both call “proceedingJoinPoint.proceed()” which calls their target object.

But then if the target object is the same, then it is going to be called twice.. Hmm.. not something you would want to happen especially if that target object is a service that withdraws money from your bank account..

According to the Spring documentation, you may specify the order in which these advices are applied, using Ordered interface, so in case the target object (that service that withdraws money from your account) is called twice, you have an opportunity to specify the order of who calls it first:)

To free the minds of many from unnecessary worries, I’ll show you what really happens when two around advices are applied to the same join point.

Here is this target object (transfer money service):

public class WireTransferMoneyService implements TransferMoneyService {
 
	public void transferMoney( Money money, 
			         Account sourceAccount,
			         Account targetAccount) {
 
		// Start the "Wire Transfer" manager
		// ...
 
		System.err.println( this.getClass().getSimpleName() + " is called" );
 
		sourceAccount.withdraw( money );
		targetAccount.deposit( money );	
	}
}

And here are the two around advices that are applied to this transfer service:

@Around("com.xmen.iii.aspect.SystemArchitecture.businessService()")
public Object doSomethingOnTransfer(ProceedingJoinPoint pjp) throws Throwable {
 
	System.err.println( Thread.currentThread().getStackTrace()[1].getMethodName() +
			" \t\twas called before " + pjp.getTarget().getClass().getSimpleName() );
 
	Object retVal = pjp.proceed();
 
	System.err.println( Thread.currentThread().getStackTrace()[1].getMethodName() +
			" \t\twas called after " + pjp.getTarget().getClass().getSimpleName());
 
	return retVal;
}
 
@Around("com.xmen.iii.aspect.SystemArchitecture.businessService()")
public Object doSomethingElseOnTransfer(ProceedingJoinPoint pjp) throws Throwable {
 
	System.err.println( Thread.currentThread().getStackTrace()[1].getMethodName() +
			" \twas called before " + pjp.getTarget().getClass().getSimpleName() );
 
	Object retVal = pjp.proceed();
 
	System.err.println( Thread.currentThread().getStackTrace()[1].getMethodName() +
			" \twas called after " + pjp.getTarget().getClass().getSimpleName() );
 
	return retVal;
}

Now it’s simple: let’s run it and see what happens… And that is what happens:

2010-02-10 19:52:47,542 INFO [org.springframework.test.context.TestContextManager] - <@TestExecutionListeners is not present for class [class com.xmen.iii.integration.TransferLoggingAspectTest]: using defaults.>
2010-02-10 19:52:47,667 INFO [org.springframework.beans.factory.xml.XmlBeanDefinitionReader] - <Loading XML bean definitions from class path resource [com/xmen/iii/integration/TransferLoggingAspectTest-context.xml]>
2010-02-10 19:52:47,808 INFO [org.springframework.beans.factory.xml.XmlBeanDefinitionReader] - <Loading XML bean definitions from class path resource [META-INF/spring/aspect-context.xml]>
2010-02-10 19:52:47,839 INFO [org.springframework.beans.factory.xml.XmlBeanDefinitionReader] - <Loading XML bean definitions from class path resource [META-INF/spring/app-context.xml]>
2010-02-10 19:52:47,917 INFO [org.springframework.context.support.GenericApplicationContext] - <Refreshing org.springframework.context.support.GenericApplicationContext@1820dda: display name [org.springframework.context.support.GenericApplicationContext@1820dda]; startup date [Wed Feb 10 19:52:47 EST 2010]; root of context hierarchy>
2010-02-10 19:52:47,917 INFO [org.springframework.context.support.GenericApplicationContext] - <Bean factory for application context [org.springframework.context.support.GenericApplicationContext@1820dda]: org.springframework.beans.factory.support.DefaultListableBeanFactory@1126b07>
2010-02-10 19:52:48,355 INFO [org.springframework.beans.factory.support.DefaultListableBeanFactory] - <Pre-instantiating singletons in org.springframework.beans.factory.support.DefaultListableBeanFactory@1126b07: defining beans [transferMoneyService,messageSource,org.springframework.aop.config.internalAutoProxyCreator,com.xmen.iii.aspect.logging.ServiceLoggingAspect#0,org.springframework.context.annotation.internalCommonAnnotationProcessor,org.springframework.context.annotation.internalAutowiredAnnotationProcessor,org.springframework.context.annotation.internalRequiredAnnotationProcessor]; root of factory hierarchy>
"
doSomethingOnTransfer                   was called before WireTransferMoneyService
doSomethingElseOnTransfer               was called before WireTransferMoneyService
WireTransferMoneyService is called
doSomethingElseOnTransfer               was called after WireTransferMoneyService
doSomethingOnTransfer                   was called after WireTransferMoneyService
"
2010-02-10 19:52:48,433 INFO [org.springframework.context.support.GenericApplicationContext] - <Closing org.springframework.context.support.GenericApplicationContext@1820dda: display name [org.springframework.context.support.GenericApplicationContext@1820dda]; startup date [Wed Feb 10 19:52:47 EST 2010]; root of context hierarchy>
2010-02-10 19:52:48,433 INFO [org.springframework.beans.factory.support.DefaultListableBeanFactory] - <Destroying singletons in org.springframework.beans.factory.support.DefaultListableBeanFactory@1126b07: defining beans [transferMoneyService,messageSource,org.springframework.aop.config.internalAutoProxyCreator,com.xmen.iii.aspect.logging.ServiceLoggingAspect#0,org.springframework.context.annotation.internalCommonAnnotationProcessor,org.springframework.context.annotation.internalAutowiredAnnotationProcessor,org.springframework.context.annotation.internalRequiredAnnotationProcessor]; root of factory hierarchy>

So, as you can see, AspectJ and Spring are modest but smart, they chain those around advices for you, which is of course niice.

Happy Advising!


28
Oct 09

Spring Insight in Action – 5 Minutes From Scratch

Spring Source Logo

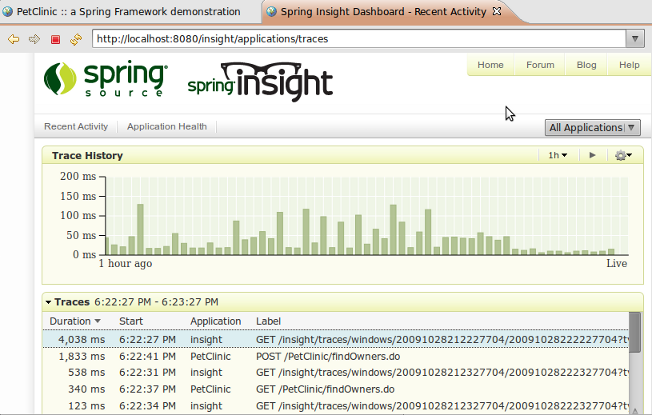
Spring Insight gives deep visibility into your application’s real activity on a request-by-request basis. For any request you can see all the JDBC queries it made, how much time it took to render, or timings for any of your major Spring beans.” – said Jon Travis in his article on a Spring blog.

That is such a great idea I though, and watched Jon’s screencast.

What actually surprised me is how simple and quick it is to try the Spring Insight in action. Here are these 3 simple steps:

Step 1. Download Spring Tool Suite

I like to think about Spring Tool Suite as an Eclipse on Spring rocks (Spring IDE, Spring Interactive Tutorials, Exception Resolution, and much more). And now ( since version 2.2 ), it comes with tc Server Developer Edition that includes Spring Insight, so the easiest way to try out Spring Insight is to download Spring Tool Suite, since it comes with it: http://www.springsource.com/products/springsource-tool-suite-download

Note that “tc Development Edition” can be downloaded and run on its own, Spring Tool Suite (STS) gives us something extra: “ready to go” sample applications that we can deploy to tc Server – all in one.

Step 2. Import a sample web application

About those sample applications… Now as you have STS unpacked/unzipped, you can run it and go to “File” –> “Import” –> “Spring Tool Suite” –> “Sample Projects”. You should see three sample applications “Hotel Booking”, “PetClinic” and “SpringTravel”. I chose “PetClinic”, but it does not really matter, we can use any sample application to play with Spring Insight.

Once you click “Ok”, STS will ask you if that is ok to download 20+ MB of JARs, you, of course, having a huge HD, would say yes, and.. here you go 1 minute later you have yourself a fully functional ready to deploy web app!

Step 3. Deploy a web application to tc Server Developer Edition

Now right click on PetClinic app, -> Run on server -> Choose Spring tc Server (it is not going to say anything about Insight, but it’s there :) ).

At this point STS will ask you to browse to the location of your tc server, it should be under the directory you installed STS, e.g in my case it was: “/opt/springsource/tc-server-6.0.20.C”

After you click “Finish”, you should see “INFO: Deploying web application archive insight.war” as one of your deployment messages in STS console.

After another minute, once your app (PetClinic in my case) is deployed, go to http://localhost:8080/insight and you should be good to go:

Spring Insight

Insight Away!


26
Jul 09

Apache Chain with Spring

“A popular technique for organizing the execution of complex processing flows is the “Chain of Responsibility” pattern, as described (among many other places) in the classic “Gang of Four” design patterns book. Although the fundamental API contracts required to implement this design patten are extremely simple, it is useful to have a base API that facilitates using the pattern, and (more importantly) encouraging composition of command implementations from multiple diverse sources.”

That is what Apache has to say as an intro to its Commons Chain API

It is no brainer, really, but Apache APIs do make it simpler to configure, implement and execute multiple Chains of Responsibilities. One thing, however, that feels “off”, when (if) implementing “Commons Chain” side by side with Spring, is there is no flexible, consistent (with Spring) way to setup Command objects: inject Command properties / refer to a single Command class as a bean, instead of duplicating the class name in Apache Chains, and Spring configuration, if Command object needs to be reused, etc…

Here is a simple way to utilize all the power that Apache offers + make it Spring friendly. Five components will be used in this example – 1 core class, 2 command classes, 1 test (driver) and Spring configuration file. Let’s see if you can figure out which is which :):

apache commons chain on spring: components

As you can see we are going to play an ultra short session of table tennis, or how it is sometimes called “Ping Pong”. It is going to be quite short, because we have two command objects: Ping and Pong, which are going to be chained, and run (by ChainRunner) once each: “Ping -> Pong”.

First, instead of relying on Apache way to configure chains, to make it consistent with all other application beans (classes) we’ll keep chain(s) configuration in Spring:

chain-config.xml:

<?xml version="1.0" encoding="UTF-8"?>
<beans xmlns="http://www.springframework.org/schema/beans"
	xmlns:xsi="http://www.w3.org/2001/XMLSchema-instance"
	xmlns:util="http://www.springframework.org/schema/util"
	xsi:schemaLocation="http://www.springframework.org/schema/beans
http://www.springframework.org/schema/beans/spring-beans-2.5.xsd
http://www.springframework.org/schema/util
http://www.springframework.org/schema/util/spring-util-2.5.xsd">
 
	<bean name="pingPongChain" class="org.apache.commons.chain.impl.ChainBase">
		<constructor-arg>
			<util:list>
				<ref bean="pingCommand" />
				<ref bean="pongCommand" />
			</util:list>
		</constructor-arg>
	</bean>
 
	<bean name="pingCommand" class="org.dotkam.samples.chain.command.PingCommand">
		<constructor-arg value="ping"/>
	</bean>
 
	<bean name="pongCommand" class="org.dotkam.samples.chain.command.PongCommand">
		<constructor-arg value="pong"/>
	</bean>
 
	<bean id="chainRunner" class="org.dotkam.samples.chain.ChainRunner"/>
 
</beans>

A “pingPongChain” is configured as “org.apache.commons.chain.impl.ChainBase”, and have two Commad classes, that implement “org.apache.commons.chain.Command” interface, wired in.

NOTE: The best practice is to keep Commands either stateless, or, if they have to have a state – immutable. If this practice is followed, these Commands can be safely reused throughout many chains (or even as stand alone utilities). That is the reason, in configuration above, parameters are injected at Command’s creation time via constructor injection.

In this example Commands are ultra simple for clarity:

PingCommand.java:

package org.dotkam.samples.chain.command;
 
import org.apache.commons.chain.Command;
import org.apache.commons.chain.Context;
 
public class PingCommand implements Command {
 
	private String message;
 
	public PingCommand( String message ) {
		this.message = message;
	}
 
	public boolean execute( Context context ) throws Exception {
 
		System.err.println( message );
		return false;
	}
}

and PongCommand.java:

package org.dotkam.samples.chain.command;
 
import org.apache.commons.chain.Command;
import org.apache.commons.chain.Context;
 
public class PongCommand implements Command {
 
	private String message;
 
	public PongCommand( String message ) {
		this.message = message;
	}
 
	public boolean execute( Context context ) throws Exception {
 
		System.err.println( message );
		return false;
	}
}

Now let’s look at the heart of the “Spring Chainer” – the “ChainRunner.java”:

package org.dotkam.samples.chain;
 
import org.apache.commons.chain.impl.ChainBase;
import org.apache.commons.chain.impl.ContextBase;
import org.springframework.beans.BeansException;
import org.springframework.beans.factory.BeanFactory;
import org.springframework.beans.factory.BeanFactoryAware;
 
public class ChainRunner implements BeanFactoryAware {
 
	private BeanFactory beanFactory;
 
	public void runChain( String chainName ) {
		try {
			createChain ( chainName ).execute( new ContextBase() );
		}
		catch ( Exception exc ) {
			throw new RuntimeException(
					"Chain \"" + chainName + "\": Execution failed.", exc );
		}
	}
 
	public void setBeanFactory( BeanFactory beanFactory ) throws BeansException {
		this.beanFactory = beanFactory;
	}
 
	protected ChainBase createChain( String chainName ) {
		return ( ChainBase ) this.beanFactory.getBean( chainName );
	}
}

It only does a couple of things, really.

By implementing Spring’s “BeanFactoryAware” interface, at runtime ChainRunner will have a reference to a “beanFactory” which it is going to use to obtain a reference to the requested chain via “createChain” method.

“ChainRunner” has an entry point which is a “runChain” method, that executes a chain by chain name (bean name in configuration file). For example, in the configuration shown above “pingPongChain” name can be provided.

It would ideally need to use a couple of custom runtime exceptions: e.g. ChainNotFoundException, IsNotChainException and ChainExecutionException, but we’ll keep it short here for clarity.

Alternatively, to strong type chains a bit, “ChainRunner” could take a Map of chains with keys as chain names, and corresponding “ChainBase” chain objects as values.

“ChainRunner” is pretty much everything that is needed in order to configure an Apache chain in Spring. We can run it by creating a JUnit (not really a test, just a driver):

ChainTest.java:

package org.dotkam.samples.chain;
 
import javax.annotation.Resource;
import org.junit.Test;
import org.junit.runner.RunWith;
import org.springframework.test.context.ContextConfiguration;
import org.springframework.test.context.junit4.SpringJUnit4ClassRunner;
 
@RunWith( SpringJUnit4ClassRunner.class )
@ContextConfiguration( locations={ "/conf/chain-config.xml"} )
public class ChainTest {
 
	@Resource
	ChainRunner chainRunner;
 
	@Test
	public void driveTheChain() {
		System.out.println("Starting up...      [Ok]");
		chainRunner.runChain( "pingPongChain" );
		System.out.println("Finised...          [Ok]");
	}
}

And here is the test/driver result:

apache commons chain on spring: results

Good start! Now it is time to sign up and see your name at the top of The International Table Tennis Federation (ITTF) World Ranking. Good Luck! :)