export DISPLAY=:0.0 vlc --fullscreen ~/mmedia/video/мультики/снежная-королева.avi |
09
Aug 10
Play Video/Audio on Remote X Server over SSH
17
Jun 10
Gradle on Gradle
 After a truly awesome presentation about Gradle that Hans Dockter gave at Philly’s Groovy and Grails user group last week, I got really excited about the project. The truth is, if you ever had to do any kind of build work in JVM world, you would feel strict limitations and inflexibility of Maven, hardcore maintenance challenges of ANT ( or ANT + IVY ) with your bones. Well, let your bones relax, here comes Gradle… : )
So where do you start? You can of course go hit the books, or watch some videos, but the true way to learn something is to experience it, at least that is my philosophy.
So here we go, let’s do it, let’s dive in to Gradle “by hand”. I was playing with many examples provided in documentation, but it still felt I am missing a big picture, so I decided to try Gradle out on a real, full blown, mature project. I thought for about 3.14159265 seconds, and decided: “Let me throw Gradle on Gradle itself”. That’s right! Let me get Gradle sources and build them with Gradle.
1. Get Gradle sources
Gradle lives downtown github: http://github.com/gradle/gradle, so getting the sources is as simple as:
$ git clone git://github.com/gradle/gradle.git |
and you have it:
$ git clone git://github.com/gradle/gradle.git Initialized empty Git repository in /home/you/playground/gradle/.git/ remote: Counting objects: 62393, done. remote: Compressing objects: 100% (15693/15693), done. remote: Total 62393 (delta 37178), reused 61976 (delta 37004) Receiving objects: 100% (62393/62393), 10.07 MiB | 190 KiB/s, done. Resolving deltas: 100% (37178/37178), done. Checking out files: 100% (2725/2725), done. $ |
2. Build “Them Sources”
You thought getting the sources was easy? Well not as easy as to build them. Funny thing is that Gradle is build with Gradle. How is that for eating some dog food? : )
Looking at “Build Gradle from source“, I see that the only thing I should do is:
$ cd gradle/ $ ./gradlew clean assemble |
which in fact goes from subproject to subproject and builds the whole thing:
:buildSrc:clean
:buildSrc:compileJava
:buildSrc:compileGroovy
:buildSrc:processResources

.... # I omitted the rest cause it is _very_ descriptive |
I could stop here, but wait, that would not be fun..
3. Meet Gradle Plugin Universe
“So what?” you think, how is it different from “mvn clean install”, or “ant build”? Well, when Maven ‘just works’ (which is 50% of the time on more than 5 people project), this particular step would not be too different. But now I want to look at some pictures to see the project I just built. And for pictures I usually go to IntelliJ : )
Of course you can start IntelliJ, import this project as a “Java project from existing sources”, try to figure out how to set the classpath for a dozen of subprojects, how to create them as modules with good names, add Groovy, Scala, Web Project Facets, etc.. but why to go through such troublesome exercise?
In Grails world, if anybody asks: “Can Grails do that?”, the most definite answer would be: “Of course, there is a plugin for that!” Turns out that Gradle is not much different: you want to create an IntelliJ project? => There is a plugin for that!
But I am here for the first time, so I have no clue what exactly I should be calling to create that IntelliJ project. Well.. why not ask Gradle.
“Dear Gradle, what can you do for me with this project?”
$ gradle -t # show me all the "tasks", hence "-t", that are available for me to play with :report ------------------------------------------------------------ Root Project ------------------------------------------------------------ Default Tasks: clean, assemble ..... # many more tasks that I omitted here :cleanIdea - Cleans IDEA project files (IML, IPR) -> :cleanIdeaModule, :cleanIdeaProject, :cleanIdeaWorkspace :idea - Generates IDEA project files (IML, IPR) -> :ideaModule, :ideaProject, :ideaWorkspace :ideaModule - Generates IDEA module files (IML) :ideaProject - Generates IDEA project file (IPR) :ideaWorkspace - Generates an IDEA workspace file (IWS) ..... # many more tasks that I omitted here |
Very cool! So I can “Generate IDEA project files (IML, IPR)” and “Clean IDEA project files (IML, IPR)”. ( Notice how “:idea” task explicitly depends on “:ideaModule, :ideaProject, :ideaWorkspace” ). These tasks are available through Gradle IDEA Plugin, which is one of many plugins that come with Gradle. So let’s create that project:
$ gradle idea |
4. Gradle in IDE
Once this is done ( takes about 64 seconds ), import it as an IDEA project, and…:
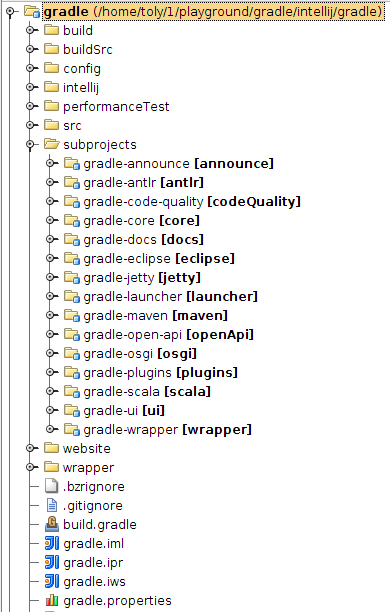
Classpath, modules, workspace, etc.. everything was pre-created by Gradle. So what can you do with the project at this point, besides starting committing your ideas, of course : ) ? Well, let’s ask Gradle, but this time using IntelliJ itself:
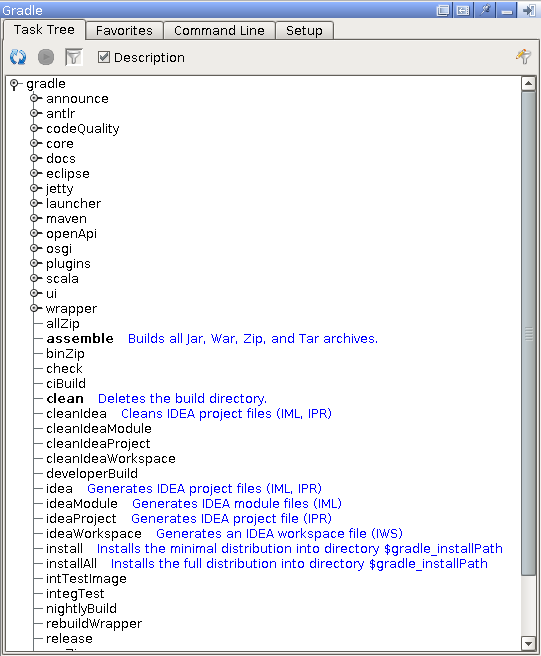
Want to take a closer look at what Gradle can do with individual module?
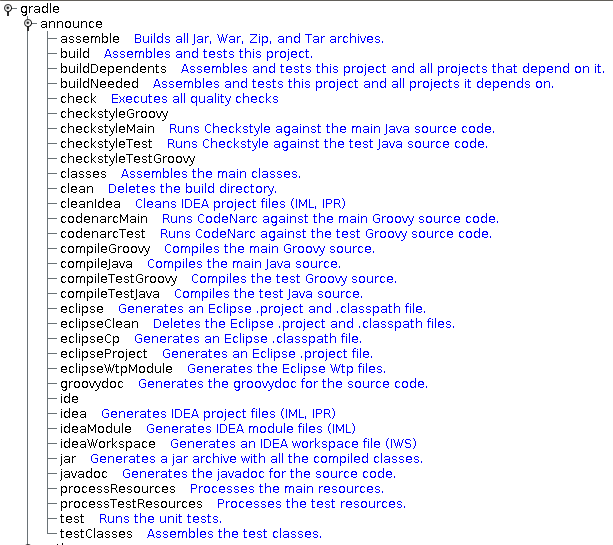
Seems like there are many things that can be done outside of Gradle box, doesn’t it?
If it doesn’t yet, how about posting formal releases to Twitter, Snarl or maybe have it sent as Ubuntu notification? Well, as I mentioned earlier: “there is a plugin for it”:
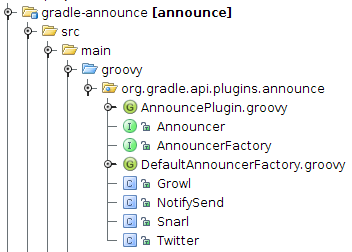
And just to give you a little taste of a Gradle build script, here is a Gradle DSL to build this plugin:

This was just a little intro, the real Gradle power is very well documented, and is just plain obvious after 5 minutes actually trying Gradle.
Gradle Away!
16
Jun 10
IntelliJ IDEA Ubuntu Launcher

IntelliJ IDEA is very easy to install: download and unzip, can’t be simpler.
However creating a launcher for it is not that straightforward, whether it is a Gnome / KDE keyboard shortcut, desktop launcher, docking launcher ( e.g. avant window navigator ) or a simple “Alt+F1” menu item.
But it is Ubuntu after all: the virtual land of unlimited possibilities.
Here is a simple launcher script that will do the trick:
#!/bin/bash export JAVA_HOME=/usr/lib/jvm/java-6-sun export JDK_HOME=/usr/lib/jvm/java-6-sun export IDEA_HOME=/opt/idea-IU-95.66 export IDEA_VM_OPTIONS="$IDEA_HOME/bin/idea.vmoptions" export IDEA_PROPERTIES="$IDEA_HOME/bin/idea.properties" cd "$IDEA_HOME/bin" export LIBXCB_ALLOW_SLOPPY_LOCK=1 ./idea.sh |
A couple of things to note:
1. Point JAVA_HOME and JAVA_JDK to the place where you have JDK installed
2. Point IDEA_HOME where you have IntelliJ IDEA installed
3. Make this script executable e.g. chmod +x idea-launcher.sh [ given that you name it “idea-launcher.sh”, of course ]
Now you are free to create any kind of launcher that suites your needs pointing it to this script.
06
Apr 10
Spring Batch: Quick Start

You heard about Spring Batch, but have this “uneasy” feeling about where/how/what you should start with? A year ago it was truly difficult for a non geek developer (most of the developers) to start with projects like Spring Batch, Spring Integration, Spring Webflow, Spring MVC, etc.. But now..
Now, you have no excuse: it is extremely simple to build a sample Spring project, of pretty much any “flavour”, that comes pre-built with unit and integration tests, that you can run right after those 12 seconds that you spent downloading the project, and resolving dependencies.
Does it sound helpful? Well, not really, since I just said what will happen, and how easy it is to make it happen, but there was no how part… I hate when people do that :)
So without further ado, here comes the “how” part:
Step 1. DON’T PANIC :)
After successful completion of Step 1, it is time for…
Step 2. Download Spring Tool Suite
As I already mentioned in “Spring Insight in Action – 5 Minutes From Scratch“, I like to think about Spring Tool Suite as Eclipse on Spring rocks (Spring IDE, Spring Interactive Tutorials, Exception Resolution, Grails support, Spring Insight, Spring tc Server, Spring Template Projects, and much more): http://www.springsource.com/products/springsource-tool-suite-download
Step 3. Create New Spring Template Project
After Spring Tool Suite is started (remember, it is just a Spring version of Eclipse, so it should look very familiar), press Ctrl+n to create “something” new, and start typing “spring temp…”:
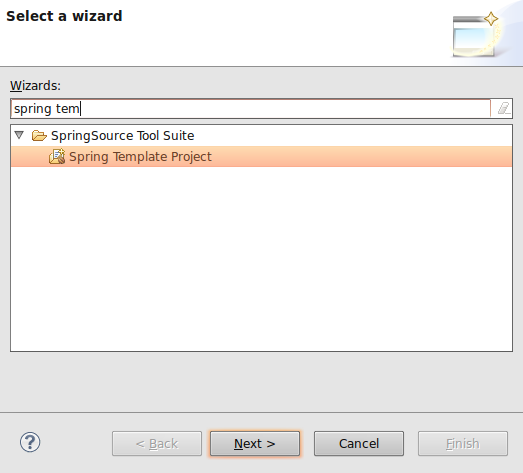
As you type, Eclipse will narrow down selection to “Spring Template Project”. Select it, and click Next:
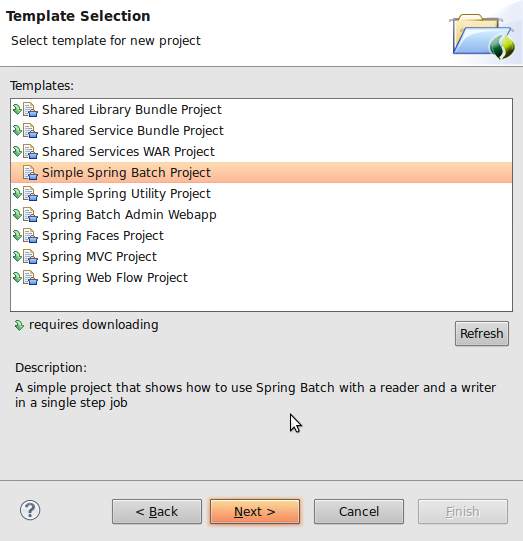
Here you can see many hot and ready to go Spring template projects that you can explore. The purpose of this article is to show how easy it is to start with Spring Batch, but for the most part, you can follow these steps to create all of the projects from the list above. (as an extra credit, try to create a Spring Integration Template project, once we done here).
Select “Simple Spring Batch Project”, and click Next:
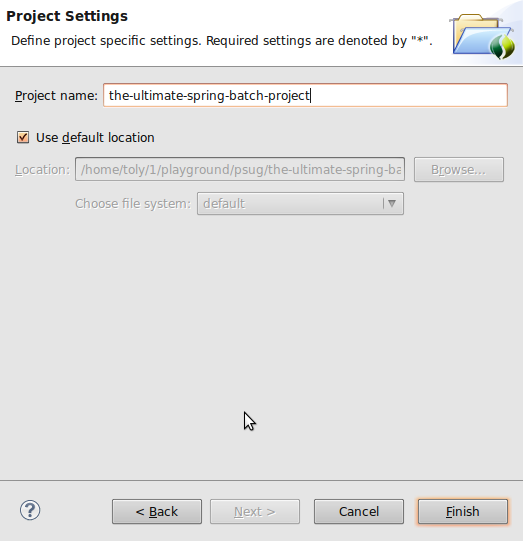
Name your fresh and ready to go Spring Batch project, and click Finish, here is what your own Spring Batch project will look like:
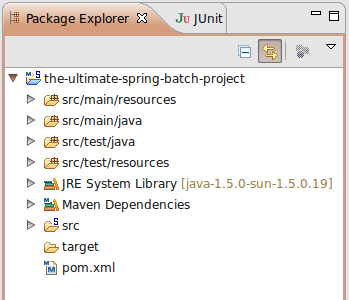
You are actually done right here, but, since curiosity is what makes us humans, let’s take a look at what’s inside:
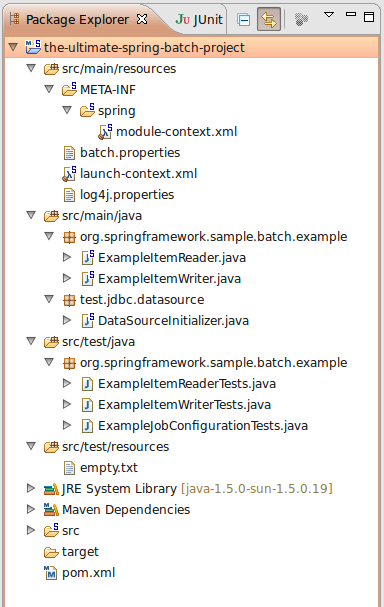
As you can see, it is a Maven structured project with all the goodies: source, tests, pom, configs, etc..
Let’s look at your first real Batch Job. Double click on “module-context.xml”:

In order to make sense of what you are looking at, you can refer to a very good and extensive Spring Batch documentation: http://static.springsource.org/spring-batch/reference/html/index.html
Step 4. Make Sure It Works
But hey, don’t just believe me that it works => make sure it does! And how would you do that? Well, again, simple: just run a test:

Now you should see some green, which actually tells you: “it works indeed”.
Now you see, that starting to work on any major Spring Project is only a couple of mouse clicks away. You can really feel how close and accessible all that knowledge is. So be brave and take it all!
Good Luck!
07
Mar 10
Think About Code Quality
 Recently one of my friends from work asked me to help him improve the process around code quality and developer productivity. So I compiled my thoughts and e-mailed to him, but then I realized that it may be very helpful for others who are involved in software industry. Are you? Then keep reading.. :)
Although tools and frameworks listed here are JVM-based language focused, the approach can be definitely reused with any other environment / language / technology. So without further ado, here it goes:
The center of the code quality monitoring can be either Continuous Integration ( e.g. Cruise Control: http://cruisecontrol.sourceforge.net/ ) or Sonar ( http://sonar.codehaus.org/ ). Sometimes both.
Continuous Integration should be setup to “Intergarte Continuously” :) which means every time something is checked in, force a build. That is the whole purpose of “Continuous Integration”, and that is why I am really against the way Cruise Control is used on some client sites [builds on demand by pressing a build button.. grrr, back to 1990-ties].
So given that “Continuous Integration” is not misused, it will be plugged in with PMD ( http://pmd.sourceforge.net/ ) / Findbugs ( http://findbugs.sourceforge.net/ ), Checkstyle ( http://checkstyle.sourceforge.net/ ) and Test Coverage ( e.g. Cobertura: http://cobertura.sourceforge.net/ ) tools that will generate reports, and reflect the only true state of the code that is checked into the repository.
Now, as to a developer corner..
RAD is nothing more than just an Eclipse with lots of bloated (mostly unused IBM plugins). But being Eclipse it is very pluginable by nature. This means that PMD / Checkstyle / Cobertura reports can be available to developers prior checking in the code. PMD / Checkstyle at compile time, Cobertura at (test) run time. If possible, try to use something like Spring Tool Suite: http://www.springsource.com/products/sts, which is also an Eclipse, but much lighter (compare to RAD), faster and smarter “pluged-in”.
As far as testing. JUnit (http://www.junit.org/) should be aimed to cover two different separate layers of testing: Component/Unit Testing and Integration Testing. Component tests should be aimed to test exclusively content of the component with all of its dependencies mocked out ( http://mockito.org/ ). Where as Integration tests should test how well components integrate together, with all the test data staged ( in case DB is used: http://www.dbunit.org/ )
As for the test coverage, 85% to 90% is a good goal to aim for. Do not sign off, until this level of coverage is reached no matter how close your dead lines are, since if you do, that will increase amount of defects ten fold, that is just a law :)
If developers work on code that is / can be deployed to an Application Server, such as Tomcat, JBoss, Geronimo ( if you’re unlucky, Websphere :) ), consider getting JRebel ( http://www.zeroturnaround.com/jrebel/ ), it’ll boost developers productivity by.. let’s just say “a lot” :)
This is how I see it, and this really works for me, and projects around me.