"; */ ?>


06
Jul 12

Integrating Font Awesome with Bootswatch

Assuming you know what Twitter Bootstrap, Font Awesome and Bootswatch are, here is how to integrate the happy trio.

Install a LESS Compiler


In order to glue everything together we would need a LESS compiler. The easiest way to install a LESS compiler is via Node Package Manager (a.k.a npm). If you need to install NPM, you can choose a “zero line” or a “fancy install” from npmjs.org

Once NPM is good to go, installing a LESS compiler is as simple as:

$ npm install --global less

Connect Font Awesome with Twitter Bootstrap


Follow first 3 steps from integration instructions from Font Awesome people. In case you plan not to have your fonts in “../font”, open “font-awesome.less”, and change the path accordingly:

@fontAwesomePath: '../font';

Less Twitter more Bootswatch


At this point you have Font Awesome integrated with Twitter Bootstrap’s LESS. Now we need to download Bootswatch LESS files and merge them with Twitter’s. Assuming you are in “twitter-bootstrap/less” directory…

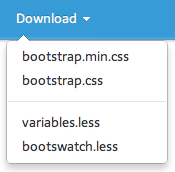
  • Go to one of the Bootswatch themes and download “variabless.less” and “bootswatch.less”
  • It would look similar to:

  • Now replace the default “variables.less” with one from Bootswatch
  • Copy “bootswatch.less” to the same directory as the other LESS files (e.g.”twitter-bootstrap/less”)
  • Open up bootstrap.less and add the line “@import “bootswatch.less”;” just before the last “utilities” import statement:
  • @import "carousel.less";
    @import "hero-unit.less";
    @import "bootswatch.less"; // <<<<<< add this line
     
    // Utility classes
    @import "utilities.less"; // Has to be last to override when necessary

Creating the One and Only “bootstrap.css”


The final step is to compile the freshly baked “bootstrap.less” into a “bootstrap.css”:

$ lessc --compress ./less/bootstrap.less > bootstrap.css
Big Thanks

to Thomas Park, the author of Bootswatch, who helped to put the above steps together.


08
May 12

Scala: Fun with CanBuildFrom

As I found out through trying.. It may not be an easy task to explain Scala’s CanBuildFrom.

Before I dive into a quick gist, I think it’d be helpful to mention the best explanation of what happens behind the CanBuildFrom’s scenes that can be found on Stack Overflow in this answer.

The gist is, Scala has multiple layers of collections extending different capabilities. Let’s look at one such capability: TraversableLike, that most of the collections implement. Since let’s be honest, a collection is not very useful if it cannot be traversed. One of the most “famous” methods from TraversableLike is “map”:

def map[B, That](f: A => B)(implicit bf: CanBuildFrom[Repr, B, That]): That = {
  val b = bf(repr)
  b.sizeHint(this) 
  for (x <- this) b += f(x)
  b.result
}

Despite of the fact that it is “Scala looking”, it is actually quite simple => takes each element of a collection that it is called on, applies a provided function “f” to each element of the collection, and returns another collection “That” as the result.

The interesting bit here is:

... (implicit bf: CanBuildFrom[Repr, B, That]) ...

which seems a bit awkward (aren’t all Scala implicits..). “implicit” just means that a Scala compiler will search for this type “CanBuildFrom[Repr, B, That]” anywhere in the “scope”. In this case it’ll first look whether there is an “implicit CanBuildFrom[Repr, B, That]..” defined on the collection that the “map” is invoked on, then it’ll look in its super type/class, etc.. until it finds it.

Once it finds it, it’ll use that as a “builder” for “That” resulting collection. The way it looks for it though is not just “let me look if “CanBuildFrom” is there”, but also “let me look if “CanBuildFrom” is there that is parametrized with a given ‘Repr’ (e.g. collection) and ‘B’ (element type)”.

Here is a quick example. Let’s say we have a BitSet:

scala> import scala.collection.immutable.BitSet
import scala.collection.immutable.BitSet
 
scala> val bits = BitSet( 42, 84, 126 )
bits: scala.collection.immutable.BitSet = BitSet(42, 84, 126)

Once we map over this BitSet with a function (“/ 2L”) that produces something different than “Int”s as elements, a BitSet can no longer handle the result (BitSet can only have Ints as its elements) hence a Scala compiler jumps to a super class of a BitSet, which is a Set, and uses its “CanBuildFrom”, since it is a bit more generic:

implicit def canBuildFrom[A]: CanBuildFrom[Coll, A, Set[A]] = setCanBuildFrom[A]

Here “A” matches a “Long” that is now (after a map was applied) a type of resulting elements:

scala> val aintBits = bits.map( _ / 2L )
aintBits: scala.collection.immutable.Set[Long] = Set(21, 42, 63)

But we want our BitSet back.. Give me my BitSet back I say:

scala> val bitsAgain = aintBits.map( _.toInt )
val bitsAgain = aintBits.map( _.toInt )
bitsAgain: scala.collection.immutable.Set[Int] = Set(21, 42, 63)

But no, it does not.. And how would it know I need a BitSet. Hmm.. Give me my BitSet I urge you:

scala> val bitsAgain = aintBits.map( _.toInt ).asInstanceOf[BitSet]
val bitsAgain = aintBits.map( _.toInt ).asInstanceOf[BitSet]
java.lang.ClassCastException: scala.collection.immutable.Set$Set3 cannot be cast to scala.collection.immutable.BitSet
                              ... ...

But no, it does not..

Logically if “CanBuildFrom” is what got us a Set from a BitSet in the first place, can it be used to get a BitSet back?

Well, let’s see. We know that we have a Set of Longs (Set[Long]), where each element after applying a map function “toInt” is of type “Int”, and we need a BitSet back. Let’s create our own “CanBuildFrom” that does just that:

scala> import scala.collection.generic.CanBuildFrom
import scala.collection.generic.CanBuildFrom
 
scala> val setToBitSetBuilder = new CanBuildFrom[Set[Long], Int, BitSet] { def apply(from: Set[Long]) = this.apply(); def apply() = BitSet.newBuilder }
setToBitSetBuilder: java.lang.Object with scala.collection.generic.CanBuildFrom[Set[Long],Int,scala.collection.immutable.BitSet] = $anon$1@60bc1caa

Now let’s use it:

scala> val bitsAgain = aintBits.map( _.toInt )( setToBitSetBuilder )
val bitsAgain = aintBits.map( _.toInt )( setToBitSetBuilder )
bitsAgain: scala.collection.immutable.BitSet = BitSet(21, 42, 63)

And woo hoo, the “bitsAgain” is truly a BitSet again. What really happened, a Scala compiler was looking for an implicit “CanBuildFrom” for a collection “Set[Long]” and the (resulting) element type “Int”. And we just handed such a thing (“setToBitSetBuilder”) to it. “setToBitSetBuilder” just returns a “builder” that is used to build a resulting collection. In this case we use Scala’s own “BitSet.newBuilder”.

To make it more readable, a pimp my library pattern can be later used => aintBits.to[BitSet].

This is rather a quick overview of what “CanBuildFrom” is, and it does not really discuss a function currying which is used by “map(A)(B):C”, skims over implicits, etc.. But it gives a little insight to where and how “CanBuildFrom” can be used.

24
Jan 12

Clojure: Perfect Language for Perfect Numbers

In number theory, a perfect number is a positive integer that is equal to the sum of its proper positive divisors, that is, the sum of its positive divisors excluding the number itself (also known as its aliquot sum). Equivalently, a perfect number is a number that is half the sum of all of its positive divisors (including itself) i.e. σ1(n) = 2n.

After watching a Functional Thinking talk by Neal Ford, needed to give it some clojure…

(ns perfect-numbers.core)
 
(defn is-factor? [divident divisor] 
   (zero? (mod divident divisor)))
 
(defn factors [number] 
   (distinct                                      ; no dups for perfect squares (e.g. 16, 64, 49)
      (mapcat #(when (is-factor? number %)        ; when a factor is found
         [(/ number %) %])                        ; return a pair of [number/factor, factor]
         (range 1 (inc (Math/sqrt number)) 1))))  ; go upto a (sqrt number) inclusively
 
(defn perfect? [number]
   (= (reduce + (factors number)) (* 2 number)))  ; check if sum of factors = 2*N
 
(def perfect-numbers
   (filter perfect? (nnext (range))))

Let’s give it a spin:

$ lein repl
REPL started; server listening on localhost port 61776
user=> (use 'perfect-numbers.core)
nil
user=> (take 4 perfect-numbers)
(6 28 496 8128)
user=>

Let’s time it:

user=> (time (doall (take 4 perfect-numbers)))
(6 28 496 8128)
"Elapsed time: 0.123 msecs"
user=> 
user=> (time (doall (take 5 perfect-numbers)))
(6 28 496 8128 33550336)
"Elapsed time: 1.8967263496E7 msecs" ( 5 hours 16 minutes )

11
Oct 11

AKKA Scheduler: Sending Message to Actor’s Self on Start

Akka has a little scheduler written using actors. This can be convenient if you want to schedule some periodic task for maintenance or similar. It allows you to register a message that you want to be sent to a specific actor at a periodic interval.

How Does AKKA Schedule Things?


Behind the scenes, AKKA scheduler relies on “ScheduledExecutorService” from the “java.util.concurrent” package. Hence when AKKA Scheduler needs to schedule “a message sent to an actor, given a certain initial delay and interval”, it just wraps the task of sending a message in a “java.lang.Runnable”, and uses a “ScheduledExecutorService” to schedule it:

service.scheduleAtFixedRate( createSendRunnable( receiver, message, true ), 
                             initialDelay, 
                             delay, 
                             timeUnit).asInstanceOf[ScheduledFuture[AnyRef]]

“Heartbeat” Actor


Let’s look at the example of scheduling a message that should be sent to an Actor’s “self” as the Actor on start. Why? Because it is a cool use case : )

“Heartbeat” would be an ideal example of such use case => “When a ‘Hearbeat Actor’ starts, it should start sending heartbeats with a given interval (e.g. every 2 seconds)”

Creating a Message

First we need to create a message that will be scheduled to be sent every so often. We’ll call it a “SendHeartbeat” message:

sealed trait HeartbeatMessage
case object SendHeartbeat extends HeartbeatMessage
Heartbeat of the Hollywood

Since sending a heartbeat needs to be scheduled as the Actor starts, the scheduling logic should be placed in the AKKA “preStart()” hook, which is called right before the Actor is started:

override def preStart() {
 
  logger.debug( "scheduling a heartbeat to go out every " + interval + " seconds" )
 
  // scheduling the task (with the 'self') should be the last statement in preStart()
  scheduledTask = Scheduler.schedule( self, SendHeartbeat, 0, interval, TimeUnit.SECONDS )
}

Another thing to note, all the other non scheduling on start logic, if any, should go before the call to the scheduler, otherwise the task will not be scheduled.

Heartbeat should also be stoppable. We could have called “Scheduler.shutdown()” in Actor’s “postStop()”, but first, this would stop all the other tasks that were potentially scheduled by others, and second, it will result in a very dark AKKA magic behavior.

Instead, the heartbeat task itself should be cancelled => which is lot cleaner than calling for the dark magic for no good reason:

override def postStop() {
  scheduledTask.cancel( true )
}

Having the above two in mind here is the Hollywood Heartbeat himself:

class Heartbeat ( val interval: Long ) extends Actor {
 
  private val logger = LoggerFactory.getLogger( this.getClass )
  private var scheduledTask: ScheduledFuture[AnyRef] = null
 
  override def preStart() {
 
    logger.debug( "scheduling a heartbeat to go out every " + interval + " seconds" )
 
    // scheduling the task (with the 'self') should be the last statement in preStart()
    scheduledTask = Scheduler.schedule( self, SendHeartbeat, 0, interval, TimeUnit.SECONDS )
  }
 
  def receive = {
 
    case SendHeartbeat =>
 
      logger.debug( "Sending a hearbeat" )
      // sending a heartbeat here.. socket.write( heartbeatBytes )
      true
 
    case unknown =>
 
      throw new RuntimeException( "ERROR: Received unknown message [" + unknown + "], can't handle it" )
  }
 
  override def postStop() {
    scheduledTask.cancel( true )
  }
}
Making Sure the Heart is Beating

We’ll use ScalaTest to run the beast. This is more of a runner than a real test, since it does not really test for anything, but it proves the point:

class HeartbeatTest extends WordSpec  {
 
  val heartBeatInterval = 2
 
  "it" should {
 
    "send heartbeats every" + heartBeatInterval + " seconds" in {
       val heartbeat = actorOf ( new Heartbeat( heartBeatInterval ) ).start()
       Thread.sleep( heartBeatInterval * 1000 + 3000 )
       heartbeat.stop()
     }
  }
}

And.. We are “In the Money“:

17:02:54,118 |-INFO in ch.qos.logback.core.joran.action.AppenderRefAction - Attaching appender named [STDOUT] to Logger[ROOT]
 
Sending a hearbeat
Sending a hearbeat
Sending a hearbeat
 
Process finished with exit code 0

09
Sep 11

ØMQ and Google Protocol Buffers

Using ZeroMQ API, we can both: queue up and dispatch / route Google Protobuf messages with X lines of code, where X approaches to zero.. Well, it is ZeroMQ after all.

Google Protocol Buffers Side


Say we have a “Trade” message that is described by Google protobufs as:

message TradeMessage {
 
    required string messageType = 1;
 
    required int32 maxFloor = 2;
    required int32 qty = 3;
    required int32 accountType = 4;
    required int32 encodedTextLen = 5;
    ... ...
}

Let’s assume that our “messageType” is always 2 bytes long. Then Google Protocol Buffers will encode it as a sequence of bytes, where first two bytes will determine protobuf’s field type (10) and field lenght (2), and the rest will be the actual UTF-8 byte sequence that would represent a message type. Let’s make “TR” a message type for “Trade” messages.

Once a Google protobuf “Trade” message is generated it will start with a message type in a following format:

byte [] messageType = { 10, 2, 84, 82 };

Where ’84’ and ’82’ are ASCII for ‘T’ and ‘R’.

Now let’s say we have a some kind of “TradeGenerator” ( just for testing purposes to simulate the actual feed / load ) that will produce Google Protobuf encoded “Trade” messages:

public static Trade.TradeMessage nextTrade() {
 
    return
        Trade.TradeMessage.newBuilder()
                      .setMessageType( "TR" )
                      .setAccountType( 42 )
                         ... ... ...
    }

Note that it sets the message type to “TR” as we agreed upon.

ØMQ Side


Sending “Trade” messages with ØMQ is as simple as drinking a cup of coffee in the morning:

ZMQ.Context context = ZMQ.context( 1 );
ZMQ.Socket publisher = context.socket( ZMQ.PUB );
publisher.bind( "tcp://*:5556" );
 
// creating a static trade => encoding a trade message ONCE for this example
Trade.TradeMessage trade = TradeGenerator.nextTrade();
 
while ( true ) {
    publisher.send( trade.toByteArray(), 0 );
}

Consuming messages is as simple as eating a bagel with that coffee. The interesting part (call it “the kicker”) is that we can actually subscribe to a “TR” message type (first 4 bytes) using just ZeroMQ API:

ZMQ.Context context = ZMQ.context( 1 );
ZMQ.Socket subscriber = context.socket( ZMQ.SUB );
subscriber.connect( "tcp://localhost:5556" );
 
// subscribe to a Trade message type => Google Proto '10' ( type 2 )
//                                      Google Proto '2'  ( length 2 bytes )
//                                             ASCII '84' = "T"
//                                             ASCII '82' = "R"
 
byte [] messageType = { 10, 2, 84, 82 };
subscriber.subscribe( messageType );
 
for ( int i = 0; i < NUMBER_OF_MESSAGES; i++ ) {
 
    byte[] rawTrade = subscriber.recv( 0 );
 
    try {
        Trade.TradeMessage trade = Trade.TradeMessage.parseFrom( rawTrade );
        assert ( trade.getAccountType() == 42 );
    }
    catch ( InvalidProtocolBufferException pbe ) {
        throw new RuntimeException( pbe );
    }
}

Now all the “TR” messages will actually go to this subscriber.

NOTE: Alternatively, you can use a “Union” Google Protocol Buffers technique (or extensions) in order to encode all different message types: here is how.